ATtiny88初体验(七):TWI
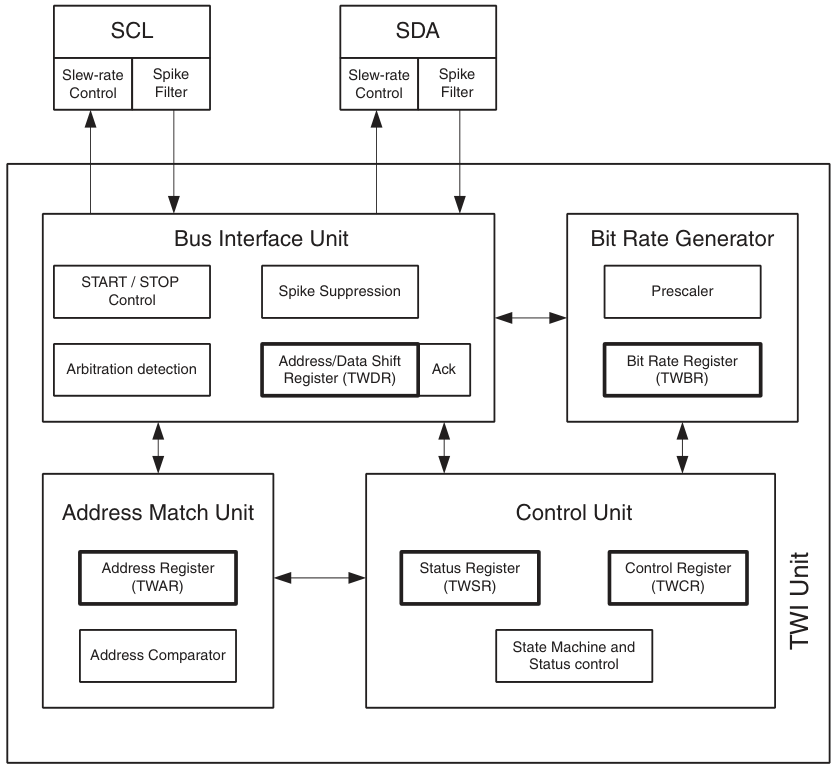
TWI模块介绍
ATtiny88的TWI模块兼容Phillips I2C以及SMBus,支持主从模式,支持7bit地址,最大允许128个不同的从机地址。在多主机模式下,支持总线仲裁。从机模式下的数据速率高达400kHz,且从机地址可编程。在睡眠模式下,支持地址识别唤醒。
注意:为了使用TWI模块, PRR 寄存器中的 PRTWI 位必须设为0。
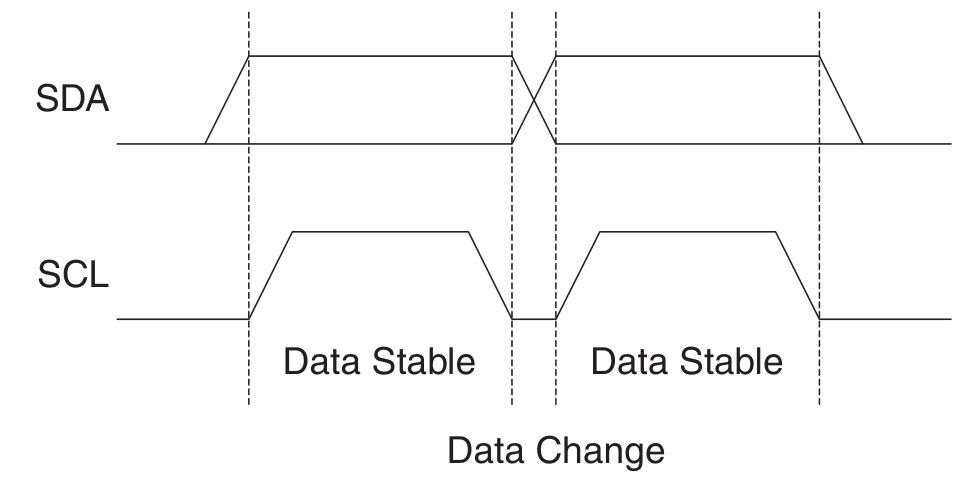
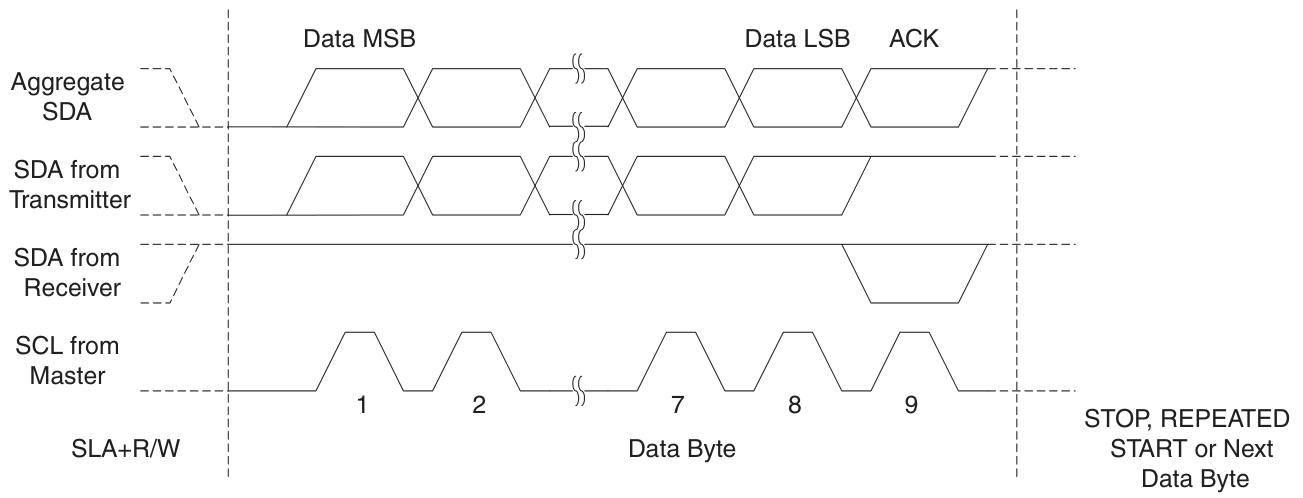
数据位传输:
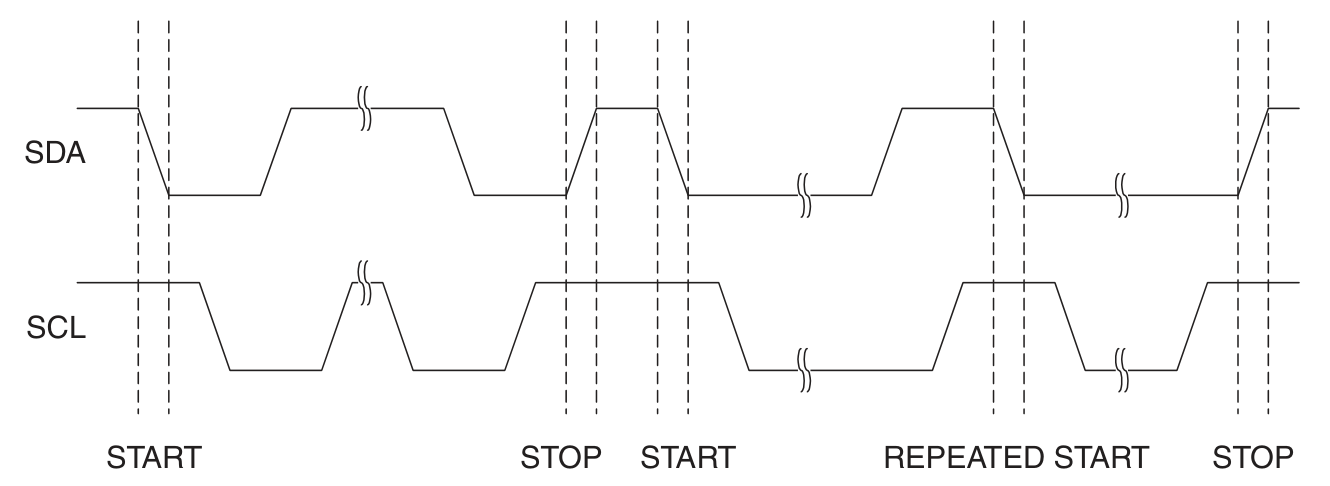
开始和停止条件:
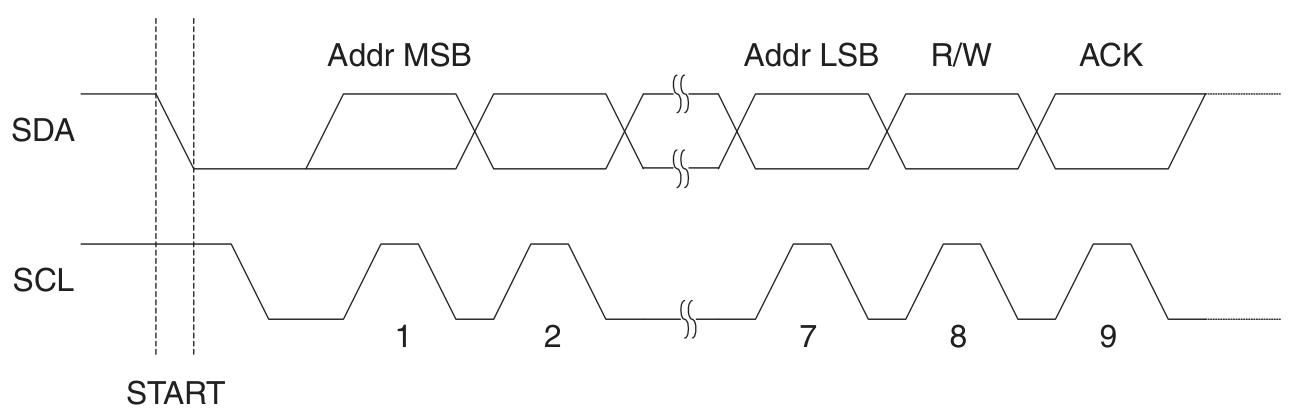
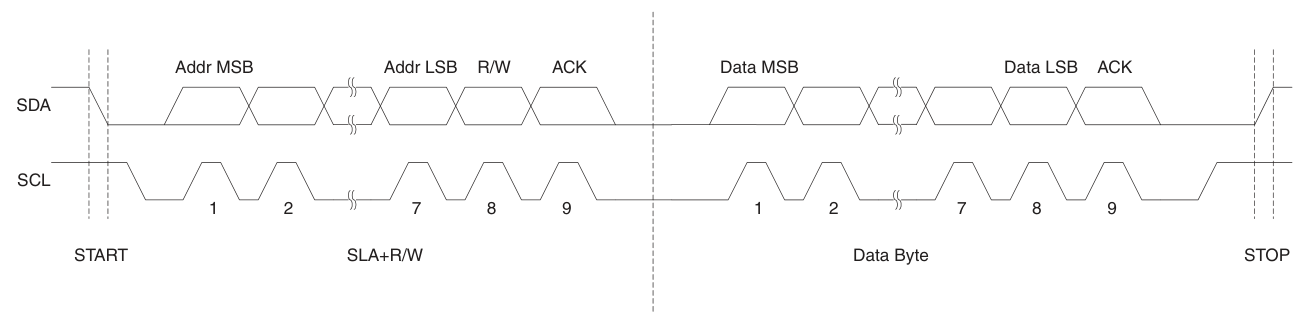
地址帧格式:
数据帧格式:
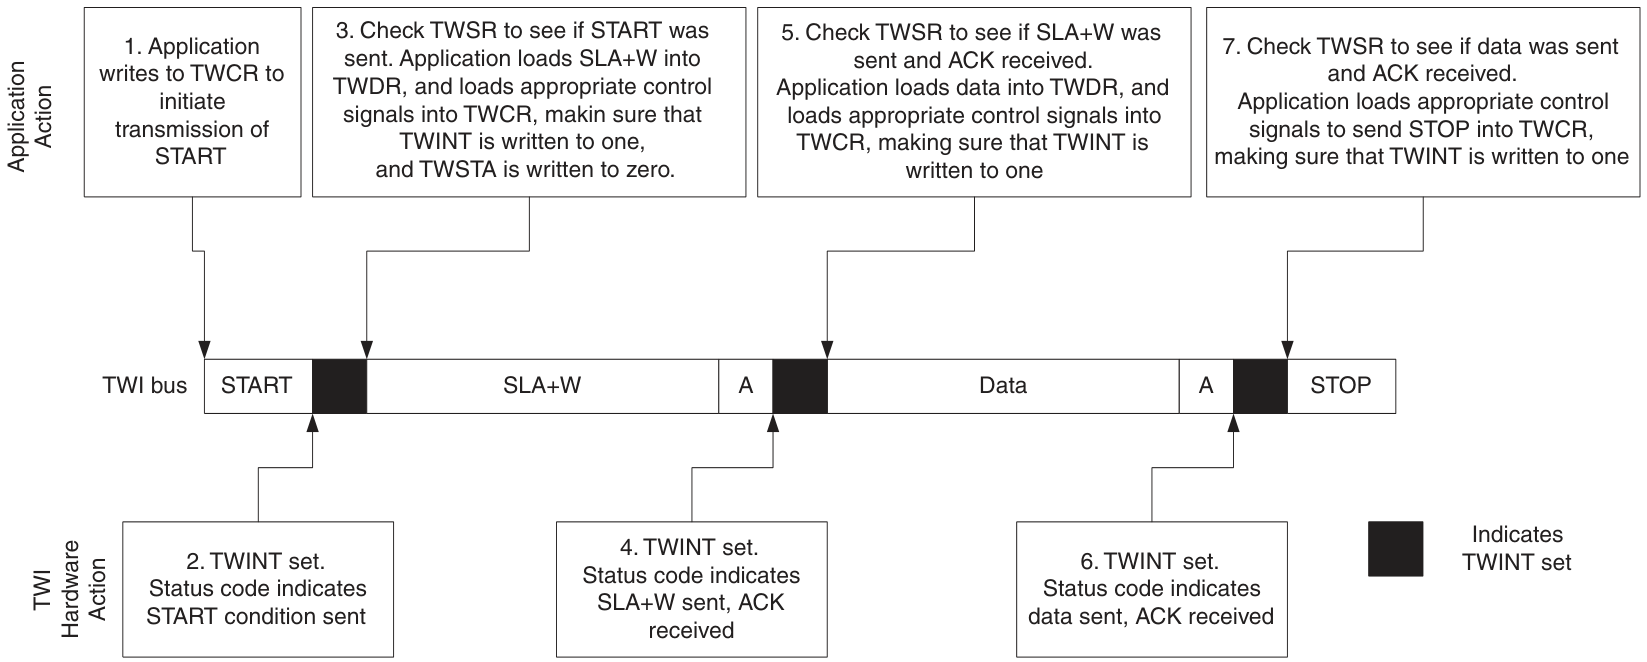
完整的传输过程:
普通模式时钟频率:
\[f_{SCL} = \frac{clk_{I/O}}{16 + (2 \times TWBR \times TWPS)}\]
高速模式时钟频率:
\[f_{SCL} = \frac{clk_{TWIHS}}{16 + (2 \times TWBR \times TWPS)}\]
其中, \(clk_{I/O}\) 为分频后的系统时钟, \(clk_{TWIHS}\) 为系统时钟。
注意:主机模式下, TWBR 值不能低于10。
下图展现了一个典型传输过程中,应用程序如何与TWI模块交互的。
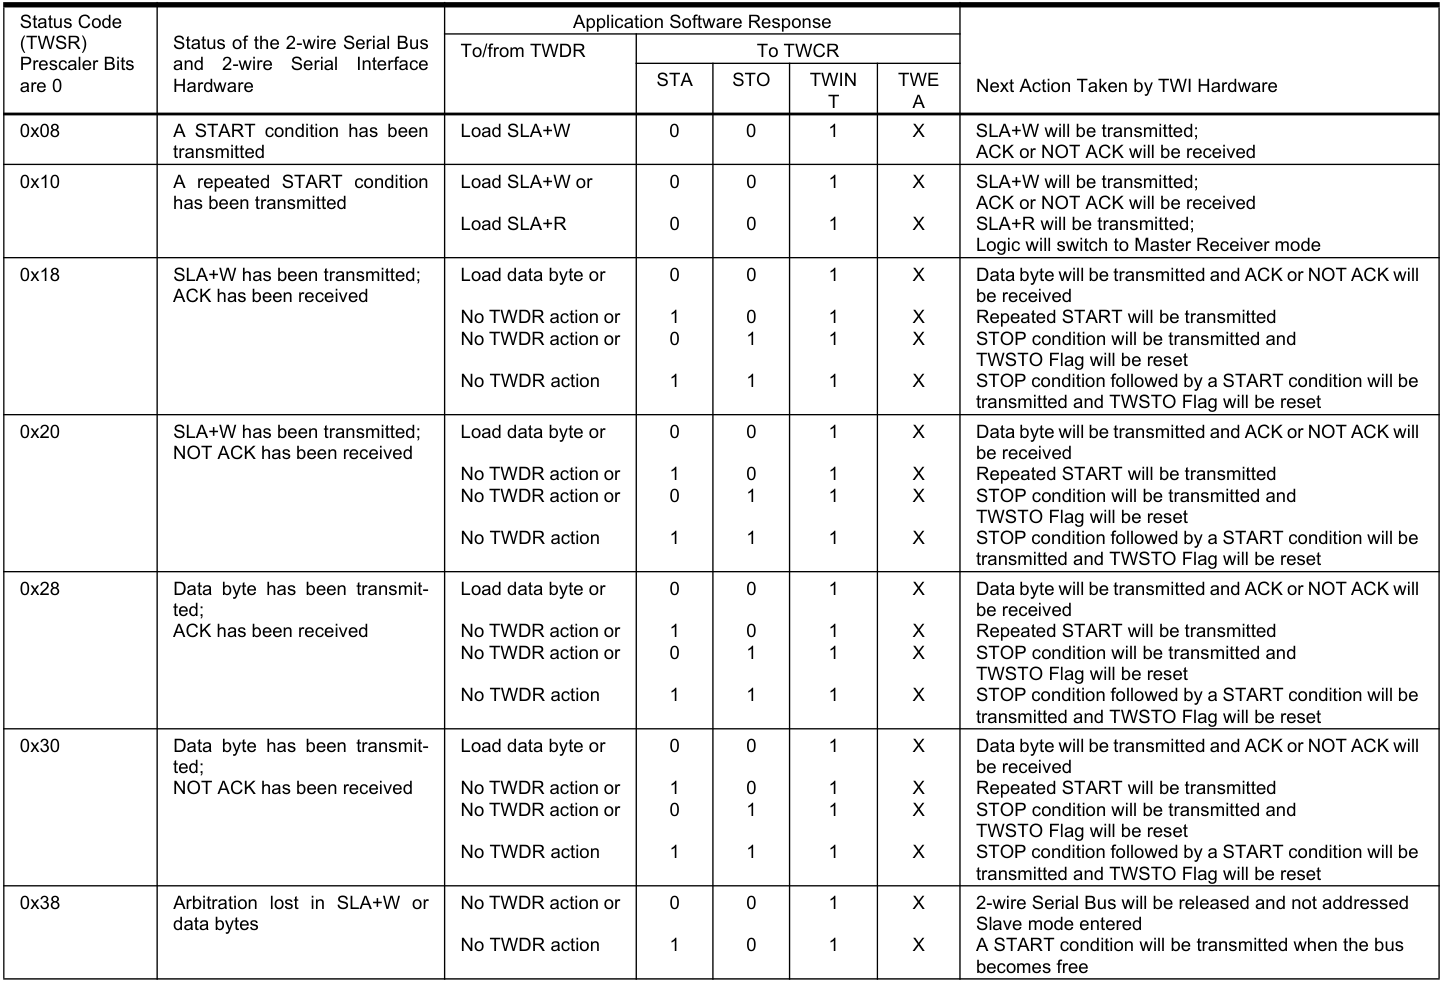
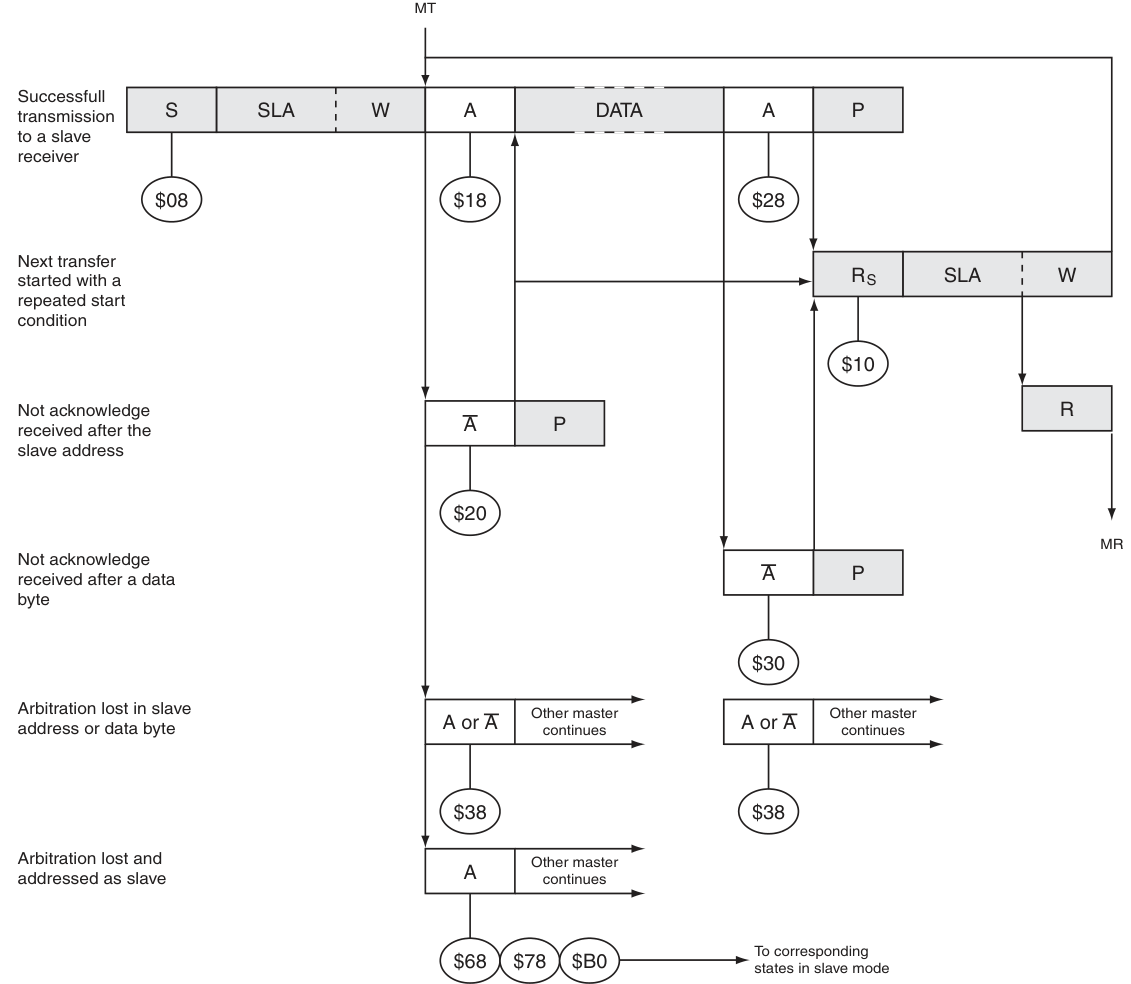
ATtiny88的TWI拥有四种模式:Master Transmitter、Master Receiver、Slave Transmitter、Slave Receiver。
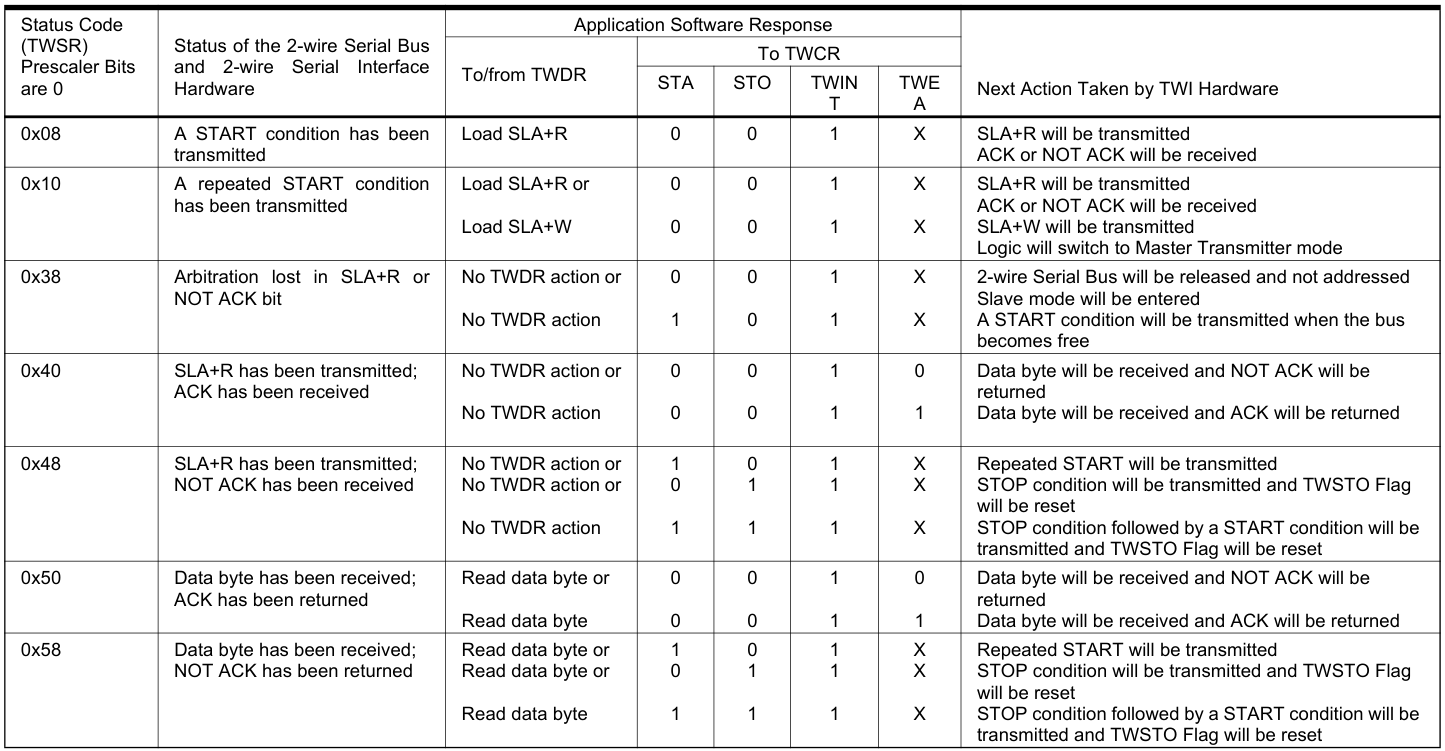
Master Transmitter模式下的状态码:
Master Receiver模式下的状态码:
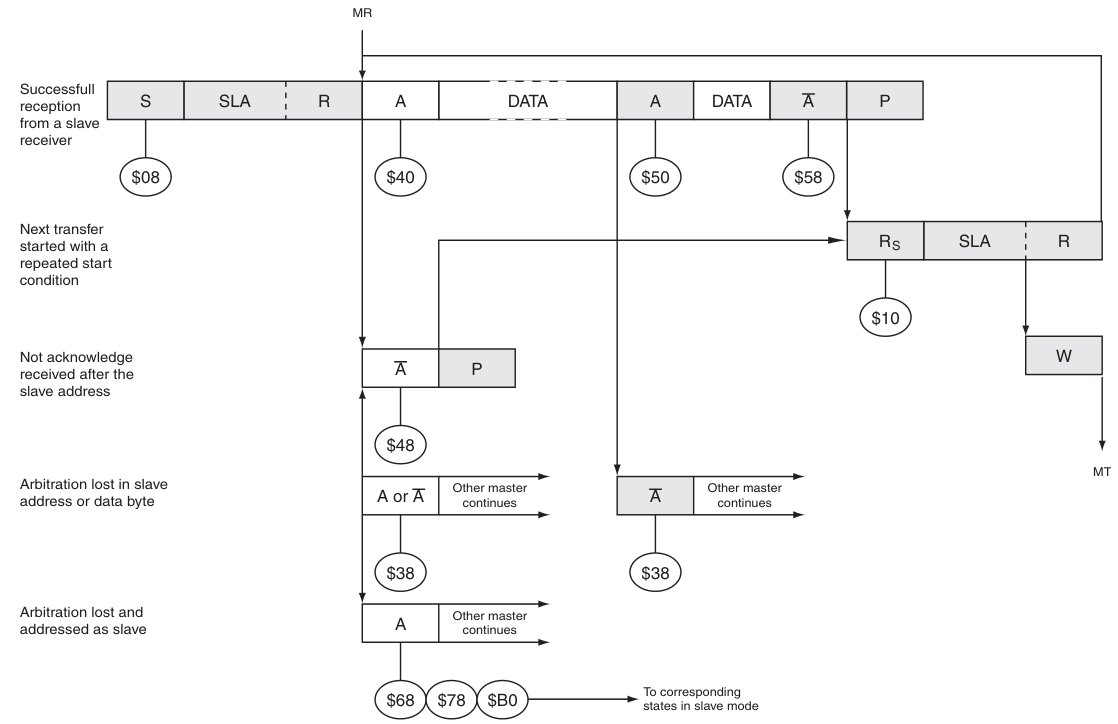
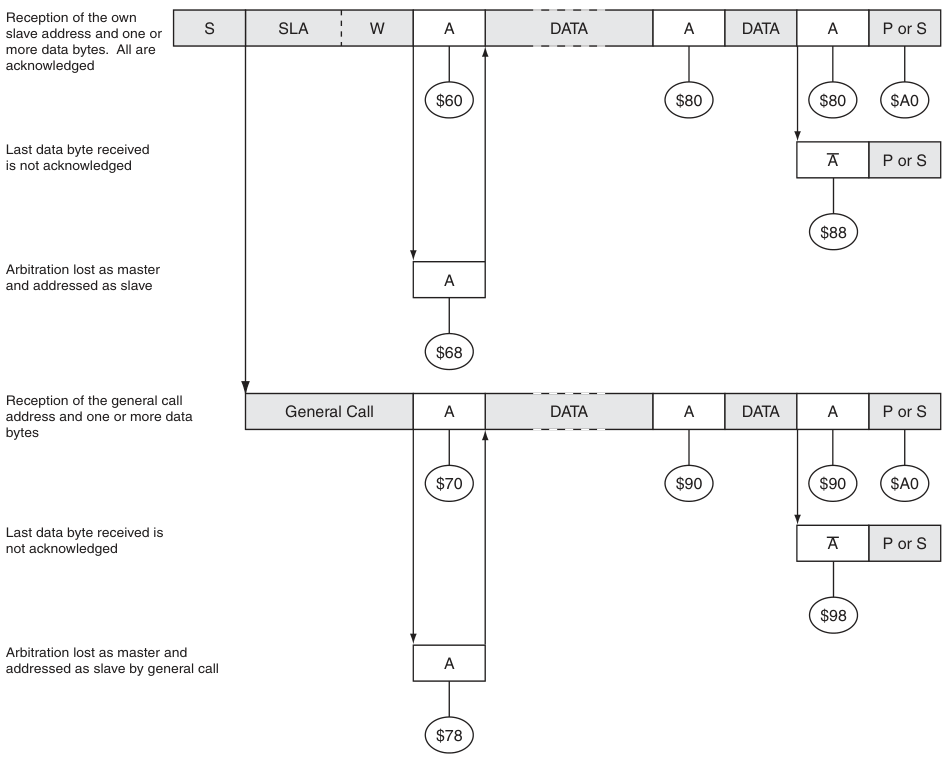
Slave Receiver模式下的状态码:
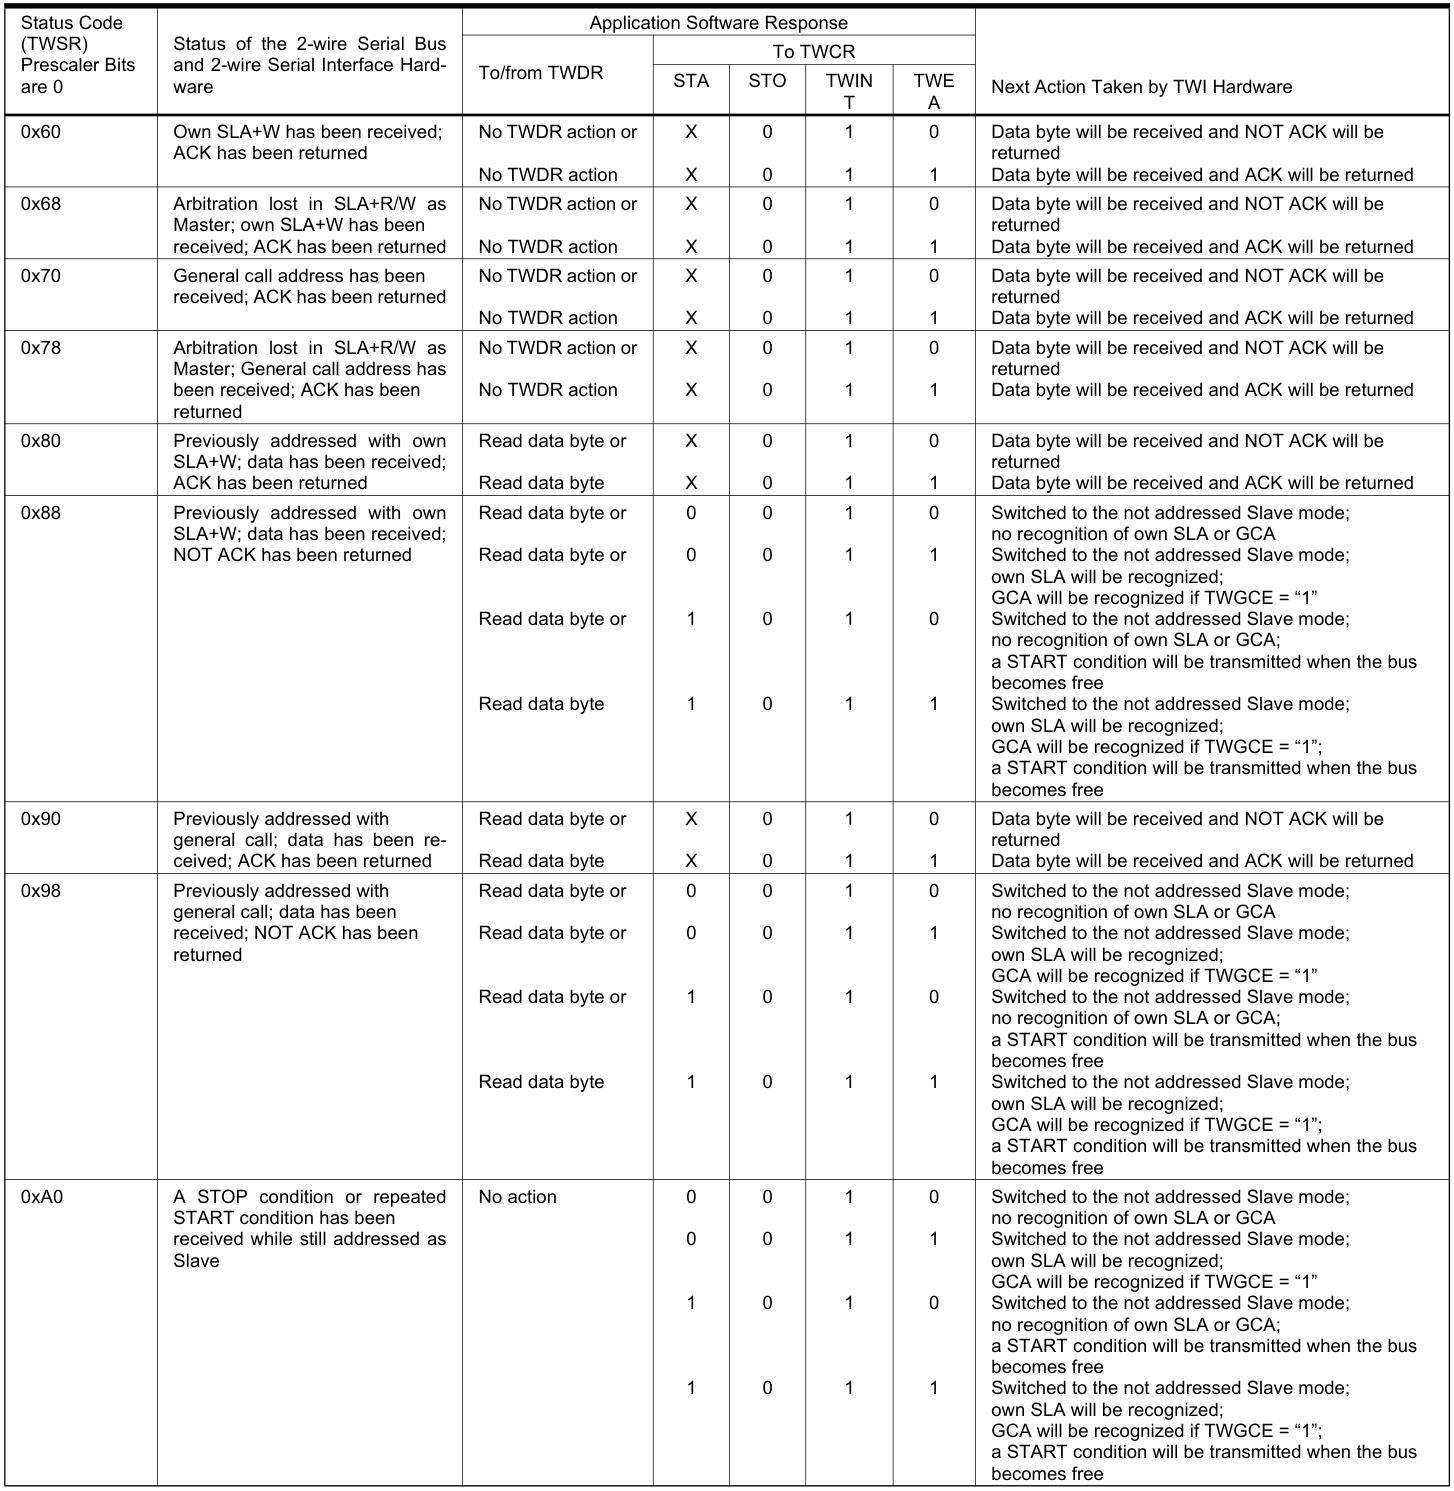
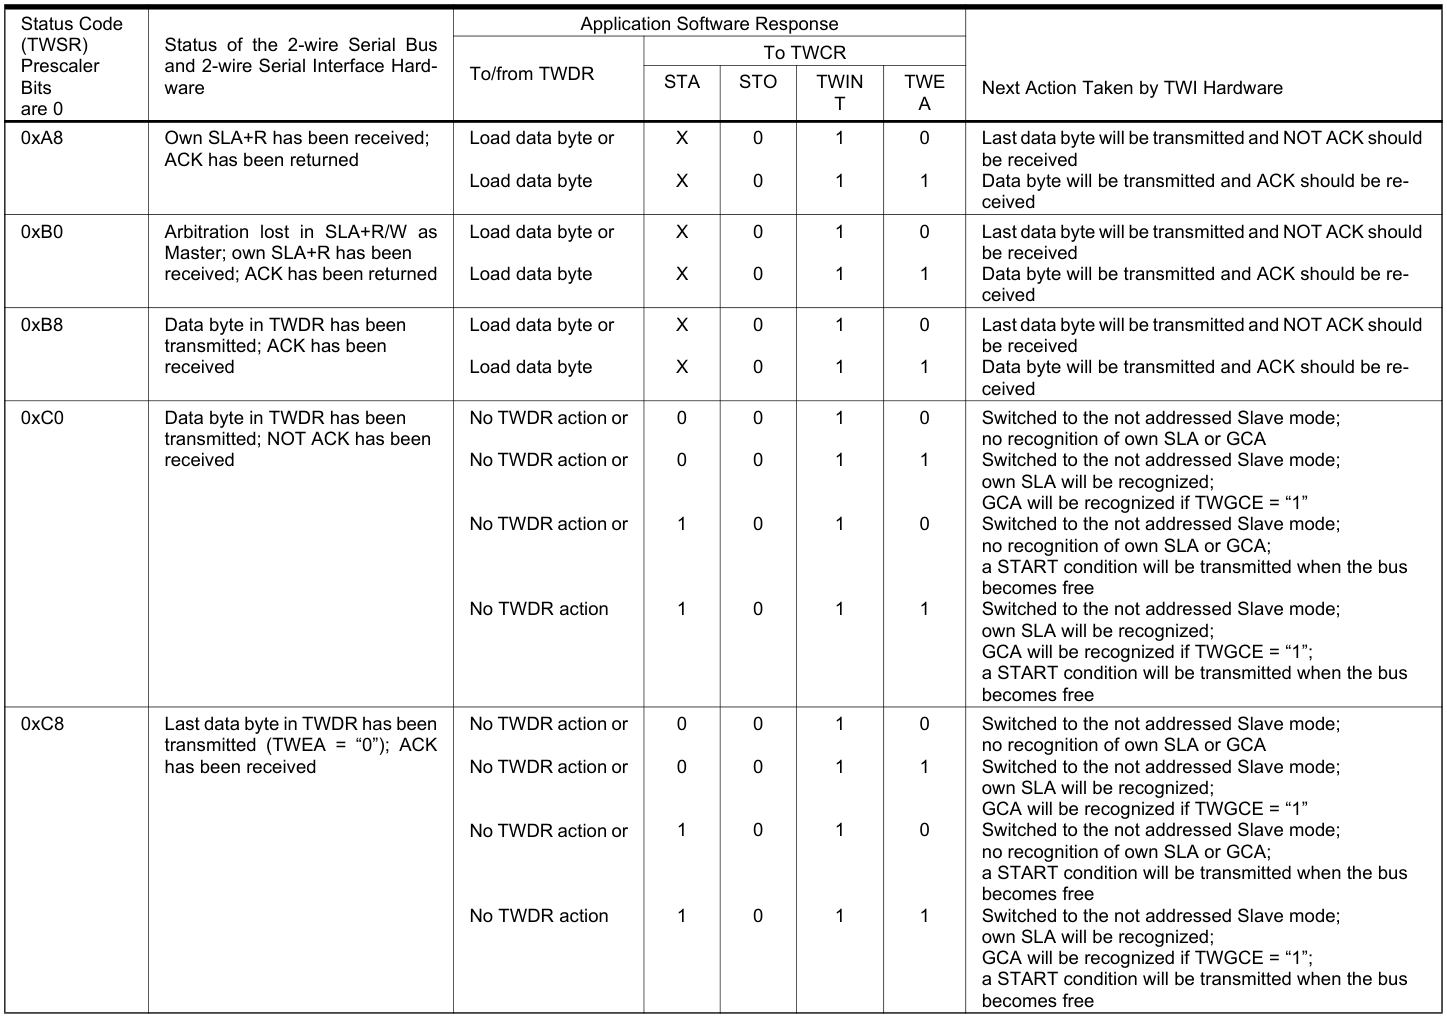
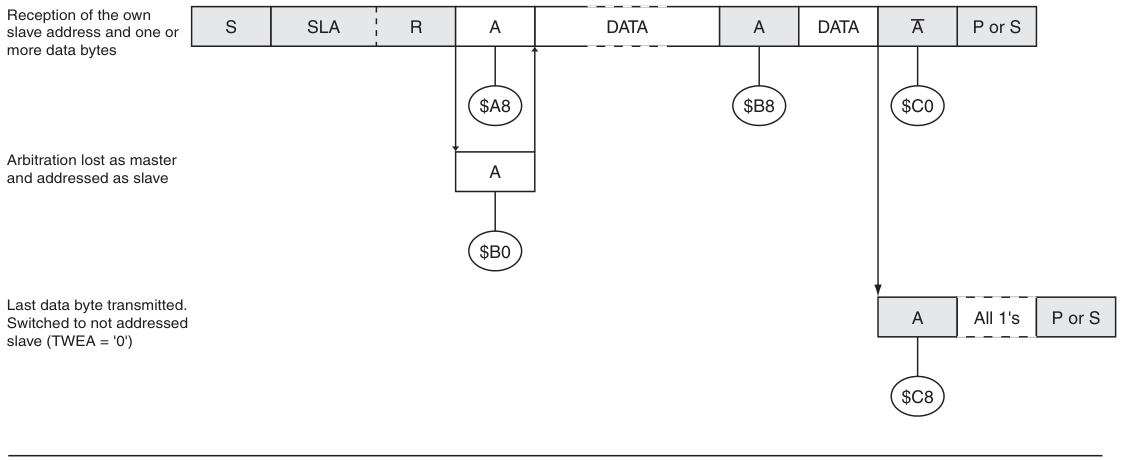
Slave Transmitter模式下的状态码:
其他状态码:

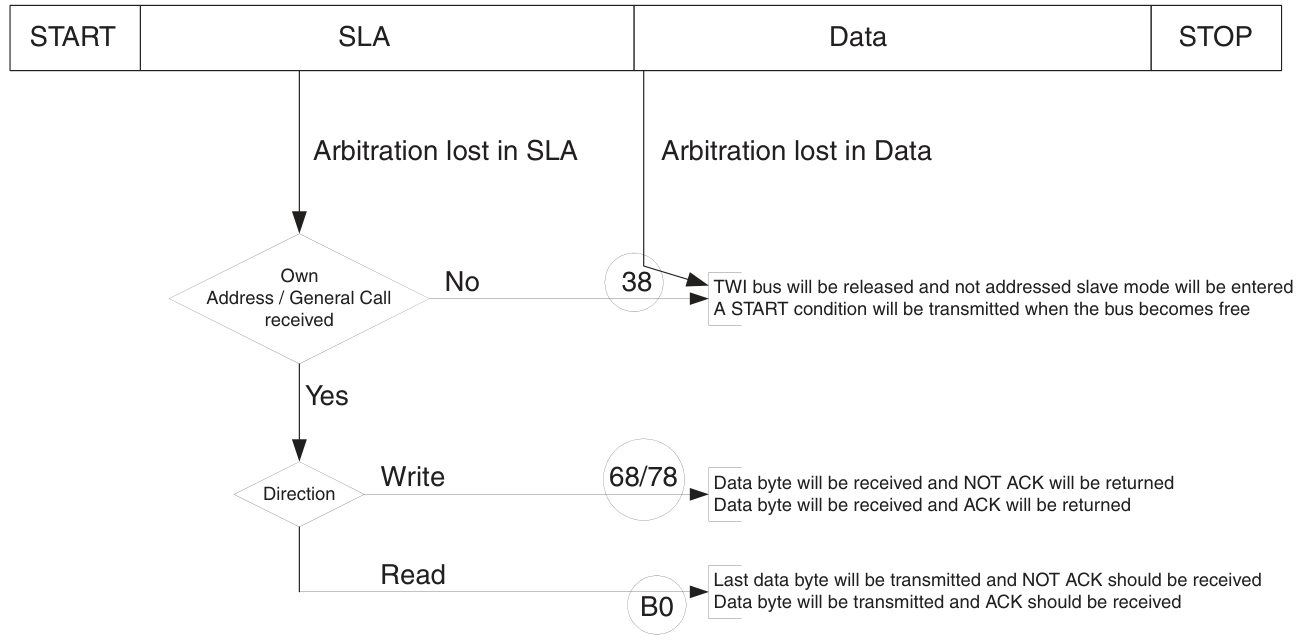
多主机仲裁过程及状态码:
寄存器

TWBR[7:0] :分频系数,在主机模式下不能低于10。

TWINT :TWI中断标志,必须写1清除(不会执行完中断自动清除),在清除前,必须完成对 TWAR 寄存器、 TWSR 寄存器、 TWDR 寄存器的操作。 TWINT 置位期间,SCL线始终保持低电平。TWEA :写1使能应答。TWSTA :写1产生START信号,在START信号传输完成后必须手动清除该位。TWSTO :写1产生STOP信号,该位会自动清除。从机状态下,设置该位可以从错误状态中恢复。TWWC :写冲突标志,在 TWINT 位为1时写 TWDR 寄存器清除。TWEN :写1使能TWI模块。TWIE :写1使能TWI中断。

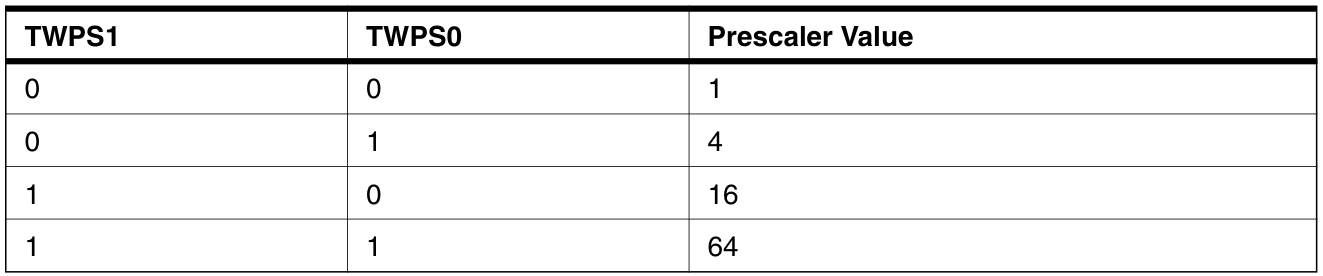
TWS :TWI状态码。TWPS :TWI分频。


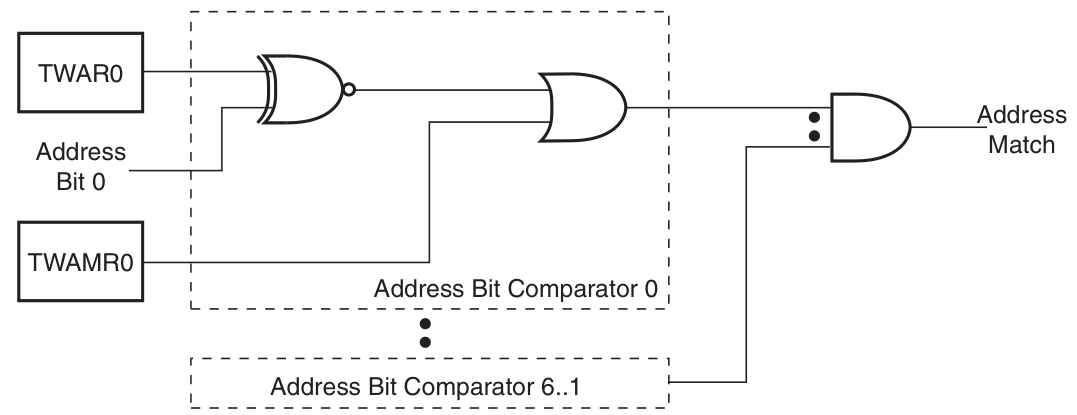
TWA[6:0] :TWI从机地址。TWGCE :写1使能General Call。

TWAM[6:0] :TWI地址掩码,设为1将忽略对应位的匹配。

代码
下面的代码展示了如何使用ATtiny88的TWI模块与SSD1306 OLED进行通信刷屏。
源文件的组织结构如下:
| .
├── Makefile
├── inc
│ ├── serial.h
│ └── serial_stdio.h
└── src
├── main.c
├── serial.c
└── serial_stdio.c
|
src/main.c 源文件的内容如下:
| src/main.c |
|---|
| #include <stdint.h>
#include <stdio.h>
#include <avr/io.h>
#include <avr/interrupt.h>
#include <serial_stdio.h>
#define OLED_ADDR 0x3C
#define oled_write_command(cmd) oled_write_byte(0, cmd)
#define oled_write_data(data) oled_write_byte(1, data)
static void oled_setup(void);
static void oled_write_byte(uint8_t dc, uint8_t data);
static void oled_fill(uint8_t color);
int main(void)
{
cli();
stdio_setup(); // initialize stdio and redirect it to serial
oled_setup(); // initialize oled
sei();
static const uint8_t colors[] = {
0x01, 0x02, 0x04, 0x08, 0x10, 0x20, 0x40,
0x80, 0x40, 0x20, 0x10, 0x08, 0x04, 0x02
};
uint8_t i = 0;
for (;;) {
oled_fill(colors[i]);
i = (i + 1) % sizeof(colors);
}
}
static void oled_setup(void)
{
static const uint8_t cmds[] = {
0xAE, 0xD5, 0x80, 0xA8, 0x3F,
0xD3, 0x00, 0x40, 0x8D, 0x14,
0x20, 0x00, 0xA1, 0xC8, 0xDA,
0x12, 0x81, 0xEF, 0xD9, 0xF1,
0xDB, 0x30, 0xA4, 0xA6, 0xAF
};
TWSR = 0x00; // TWPS = 1
TWBR = 12; // TWBR = 12, freq = 16MHz / (16 + 2 * 12 * 1) = 400KHz
TWHSR = 0x00; // disable high speed mode
for (uint8_t i = 0; i < sizeof(cmds); i++) {
oled_write_command(cmds[i]);
}
oled_fill(0x00);
}
static void oled_write_byte(uint8_t dc, uint8_t data)
{
// transmit START condition
TWCR = _BV(TWINT) | _BV(TWSTA) | _BV(TWEN);
while (!(TWCR & _BV(TWINT)));
// transmit SLA+W
TWDR = OLED_ADDR << 1;
TWCR = _BV(TWINT) | _BV(TWEN);
while (!(TWCR & _BV(TWINT)));
// transmit control byte
TWDR = dc ? 0x40 : 0x00;
TWCR = _BV(TWINT) | _BV(TWEN);
while (!(TWCR & _BV(TWINT)));
// transmit data byte
TWDR = data;
TWCR = _BV(TWINT) | _BV(TWEN);
while (!(TWCR & _BV(TWINT)));
// transmit STOP condition
TWCR = _BV(TWINT) | _BV(TWSTO) | _BV(TWEN);
// Note that TWINT is NOT set after a STOP condition has been transmitted
}
static void oled_fill(uint8_t color)
{
oled_write_command(0x21);
oled_write_command(0x00);
oled_write_command(0x7F);
oled_write_command(0x22);
oled_write_command(0x00);
oled_write_command(0x07);
for (uint8_t i = 0; i < 128; i++) {
for (uint8_t j = 0; j < 8; j++) {
oled_write_data(color);
}
}
}
|
参考资料
- ATtiny88 Datasheet